To install a clevis hook safely and effectively, you need to follow precise steps. Select a certified hook that matches your receiver hitch and application. Gather all necessary tools before you begin. Inspect each hook for cracks, distortion, or wear.
Reliable products like Powerful Machinery’s Clevis Grab Hook and Clevis Slip Hooks help you meet strict OSHA and ASME safety standards. If you ignore safety procedures, you risk dropped loads, equipment damage, or injury.
Use only hooks with proper working load limits and inspect your receiver hitch daily to prevent accidents.
Safety Guideline | Consequence |
|---|---|
Failure to comply with installation procedures | Stripped threads and loss of load |
Using worn-out or damaged hooks | Increased risk of equipment failure |
Not inspecting slings and attachments daily | Potential for accidents and injuries |
Remember, knowing how to install a clevis hook correctly protects you and your equipment.
Key Takeaways
Select the right clevis hook that matches your load requirements and safety standards. This choice ensures safe lifting and prevents accidents.
Always inspect hooks and pins for damage before installation. Regular checks help maintain safety and reliability in your lifting system.
Gather all necessary tools and wear appropriate safety gear before starting. This preparation minimizes risks and enhances efficiency during installation.
Perform a final safety check after installation. Confirm that all connections are secure to protect yourself and your equipment during use.
Document your inspections and installations. Keeping records helps meet safety standards and ensures compliance with regulations.
Choose Clevis Hook and Mounts
Select Hook Type and Grade
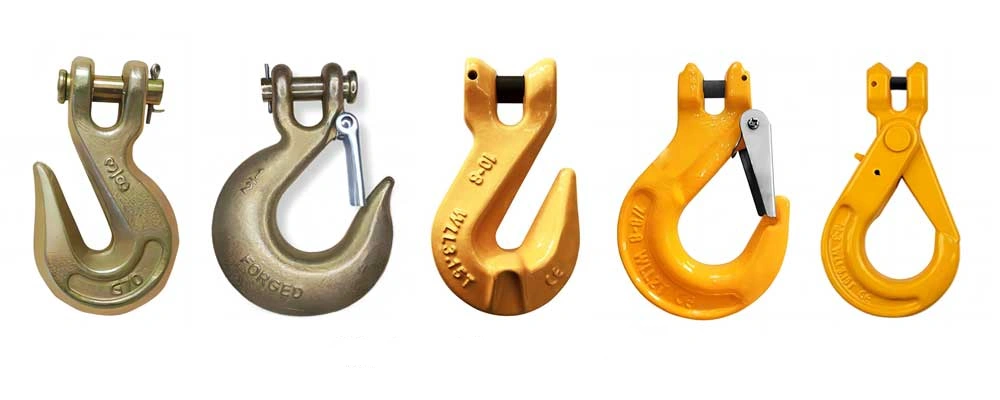
Start by identifying the right hook for your application. You want a hook that matches your load requirements and safety standards. Powerful Machinery’s Clevis Grab Hook and Clevis Slip Hooks offer certified performance for demanding jobs. Each hook type serves a specific purpose.
A grab hook holds chain links in place for load binding. A slip hook allows for easier attachment and movement.
When selecting a hook, pay close attention to the grade. The grade determines the strength and working load limit. Here is a quick comparison:
Grade | Description |
|---|---|
Grade 80 | Minimum standard for lifting, made from heat-treated alloy steel. |
Grade 100 | Provides about 25% more strength than Grade 80, common for most lifting tasks. |
Grade 120 | Offers 50% more strength than Grade 80, still emerging in the U.S. market. |
For general cargo control, Grade 43 or Grade 70 hooks are common. Grade 70 hooks provide a higher safe working load than Grade 43. Both grades use a 4:1 safety factor, which means the hook can safely support loads up to four times its rated capacity. Always match the hook grade to your lifting or rigging needs.
Tip: Choose a hook that is easy to replace if damaged. This saves time and keeps your equipment in service.
Check Compatibility with Clevis Mounts
Next, ensure your hook fits the clevis mounts you plan to use. Clevis mounts must match the hook size and type for a secure connection. Consider these factors:
Material compatibility: The hook and clevis mounts should resist corrosion and chemical reactions.
Pipe size and diameter: The hook must fit the clevis mounts without excess movement.
Weight capacity: Both the hook and clevis mounts must handle the full load safely.
Environmental conditions: Select hooks and clevis mounts that withstand weather or chemical exposure.
You may need to install a hook on a bucket or other attachment. In these cases, check that the clevis mounts provide a stable base for the hook. Proper alignment prevents twisting and uneven loading. Always verify that the clevis mounts and hook work together as a system. This step ensures safety and extends the life of your lifting equipment.
Gather Tools and Safety Gear
Required Tools for Installation
Before you begin installing a clevis hook, gather all necessary tools to ensure a smooth process. You need a wrench or socket set that matches the pin size of your hook. A hammer helps you seat the pin securely. Use pliers to bend the cotter pin and lock it in place.
If you work with larger hooks, a torque wrench allows you to apply the correct force and avoid over-tightening. Keep a wire brush nearby to clean the mounting area and remove debris. Always check that your tools are in good condition. Damaged tools can slip and cause injury.
Organize your workspace so you can reach each tool quickly. This preparation reduces downtime and helps you install the hook efficiently.
Tip: Lay out your tools before starting. This step saves time and prevents mistakes during installation.
Personal Protective Equipment
Safety is critical when working with lifting hardware. You must wear the right personal protective equipment to protect yourself from hazards. In industrial settings, the following gear is recommended:
Hard hat – Protects your head from falling objects or overhead hazards.
Safety glasses – Shield your eyes from debris and flying particles.
Gloves – Improves grip and protects your hands from cuts and burns.
Steel-toe boots – Keep your feet safe if something heavy drops.
High-visibility vest – Helps everyone see you in busy work areas.
Hearing protection – Important in environments with loud equipment.
Put on your safety gear before handling the hook or any heavy components. Gloves help you grip the hook securely and prevent cuts from sharp edges. Safety glasses shield your eyes when you drive the pin or clean the mounting area. Steel-toe boots protect your feet if the hook or chain falls.
High-visibility vests make you noticeable in busy zones, reducing the risk of accidents. Hearing protection is essential if you work near loud machinery. By wearing the correct gear, you create a safer environment and reduce the chance of injury during hook installation.
Inspect Components
Before you install a clevis hook, you must inspect every component for safety and reliability. Careful inspection helps you avoid equipment failure and ensures your lifting system performs as expected.
Examine Hook and Pin
Begin by examining the hook and its pin. Look for any signs of damage or wear that could compromise safety. Use the following table as a checklist during your inspection:
Inspection Criteria | Description |
|---|---|
Missing or illegible hook manufacturer’s identification | Identification must be clear and present. |
Excessive pitting or corrosion | Any significant corrosion must be addressed. |
Cracks, nicks, or gouges | Any visible damage disqualifies the hook. |
Wear | Wear exceeding 10% of the original dimensions is unacceptable. |
Deformation | Any visible bend or twist is a concern. |
Throat opening distortion | An increase in throat opening beyond 5% is not allowed. |
Inability to lock | Self-locking hooks must function properly. |
Inoperative latch | Latches must close the hook’s throat effectively. |
Damaged hook attachment | All securing means must be intact. |
Evidence of heat exposure | Any signs of heat damage or unauthorized welding are critical. |
Unauthorized alterations | Modifications like drilling or grinding are not permitted. |
Next, check the pin that secures the hook. Use this table to guide your inspection:
Condition | Description |
|---|---|
Excessive pitting, corrosion, nicks, or gouges | Material loss reduces the hook’s capacity. |
Bent, twisted, distorted, stretched, elongated, cracked, or broken components | Remove from service immediately. |
Signs of heat damage, such as discoloration or weld spatter | These can weaken the hook. |
Bent load pins or damaged threads | These can lead to failure and dropped loads. |
Tip: Schedule inspections based on service level. For normal use, inspect yearly. For heavy use, inspect semiannually. For severe conditions, inspect quarterly.
Inspect Chain or Attachment Point
You must also inspect the chain or attachment point before connecting the hook. Make sure anchor points are robust, free from rust, and securely attached. Check for any signs of wear, deformation, or damage. Regular inspections help you maintain the integrity of your lifting system and protect everyone on site.
Always follow established safety procedures and regulations. This practice keeps your equipment in top condition and ensures the safety of your team and your load.
How to Install Clevis Hook?
Installing a clevis hook correctly is essential for safe and reliable lifting or towing. Follow these step-by-step instructions to ensure you complete the process efficiently and securely.
Whether you are working with Powerful Machinery’s Clevis Grab Hook or Clevis Slip Hooks, these guidelines will help you understand how to install clevis hook for various applications, including bucket hook installation.
Align Hook and Chain Link
Begin by positioning the hook and the chain link or attachment point. Hold the chain so the link you want to connect lines up with the clevis opening. Make sure the hook’s throat faces the direction of the load. This alignment prevents twisting and uneven force during use.
For bucket hook installation, place the hook at the designated mounting point on the bucket or attachment. Check that the mounting surface is clean and free from debris. Proper alignment at this stage ensures the hook will sit flush and distribute the load evenly.
Tip: Always use the correct size hook for your chain or attachment. A mismatch can cause slippage or damage during operation.
Insert Pin and Secure
Once you have aligned the hook and chain link, insert the clevis pin through the holes in the hook and the chain link. Push the pin all the way through until it is flush with the opposite side.
For hooks with a cotter pin, slide the cotter pin through the hole at the end of the clevis pin. Use pliers to bend the cotter pin legs outward, locking them in place. This step prevents the pin from backing out during use.
If you are installing a clevis slip hook with a safety latch, check that the latch closes fully over the hook’s throat. The latch should move freely and snap shut without obstruction. For bucket hook installation, secure the hook to the mounting bracket using the supplied hardware.
Tighten all bolts or nuts to the manufacturer’s recommended torque. Do not over-tighten, as this can damage the hook or mounting point.
Note: Always use new cotter pins or safety latches when installing a hook. Reusing old hardware can compromise safety.
Final Safety Check
After you finish installing the hook, perform a thorough safety check before putting it into service. This step is critical for anyone learning how to install clevis hook safely and effectively.
Inspect the hook, pin, and cotter pin or latch for proper installation.
Confirm that the hook moves freely but does not wobble or shift in the mount.
Check that the chain link sits securely in the hook’s throat.
Ensure all hardware is tight and there are no visible gaps or misalignments.
For towing applications, always replace worn or damaged safety chains before use.
Verify that brake and signal wiring is intact and connected.
Make sure the hitch pin or lock is fully secured.
Attach the breakaway cable to the tow vehicle if equipped.
Double-check the hitch connection after any stop or refueling.
When using safety chains, select chains rated for your trailer’s weight. Attach them to the designated points on both the trailer and the towing vehicle. Cross the chains under the trailer tongue to create a cradle effect.
Leave enough slack for turns, but avoid excessive slack that could drag or tangle. Inspect chains regularly for wear, kinks, or damage.
Safety Reminder: Never skip the final safety check. This habit protects you, your equipment, and everyone around you.
By following these steps, you ensure that you know how to install clevis hook the right way. Proper installation and safety checks help prevent accidents and extend the life of your lifting or towing system.
Safety and Verification
Double-Check Connections
You must double-check every connection before you use your clevis hook. Start by inspecting the hook, pin, and chain link. Make sure each part sits securely and shows no signs of movement or misalignment. Look for gaps or loose hardware. Confirm that the cotter pin or safety latch locks in place.
If you use a slip hook, check that the latch closes fully and moves freely. Review the attachment point for stability. If you see any damage or wear, replace the part before use.
Tip: Document your inspection and installation. Keep records of each check. OSHA and ASME standards require periodic inspections and documentation at least every 12 months, or more often in harsh conditions. Third-party inspection providers can help you meet compliance requirements.
Test with Light Load
After you confirm all connections, test the system with a light load. Attach a weight that is well below the working load limit of your hook and chain. Lift or pull slowly while watching for any shifting or unusual movement.
Listen for clicks or snaps that may signal a problem. If the hook, pin, or chain shows any sign of stress, stop immediately and inspect again. This step helps you catch issues before you handle heavier loads.
Use only certified hooks and chains for testing.
Never skip the light load test, even if you feel confident in your installation.
Common Mistakes to Avoid
Many users make the same mistakes during clevis hook installation. Avoid these errors to keep your equipment and team safe:
Using chains that are too weak for the load can cause failure.
An incorrect attachment may lead to disconnection during towing.
Not allowing enough slack can result in dragging or breaking chains.
Skipping regular inspections lets wear go unnoticed and increases risk.
Failing to cross safety chains raises the chance of trailer detachment.
Using generic chain hooks can reduce the strength of your chain by up to 25 percent. This loss of capacity creates a serious hazard during towing or lifting. Always select hooks rated for your specific load and application.
Note: Understanding ASME shackle inspection criteria and following best practices for documentation will help you maintain compliance and ensure long-term safety.
Conclusion
You ensure safety and efficiency when you follow each step for clevis hook installation. Powerful Machinery’s certified hooks offer high strength, snap-lock safety, and corrosion resistance, making them reliable for construction, marine, and industrial use.
Always perform a final safety check before lifting. Refer to product specifications and industry standards like ASME B30.10-2019 for compliance.
Benefit | Description |
|---|---|
Safety | Snap-lock prevents accidental opening during lifting operations. |
Reliability | High load limits ensure dependable performance. |
Durability | Corrosion-resistant for harsh environments. |
FAQ
How do you know which clevis hook size to use?
Check your chain’s diameter and working load limit. Match the hook size to the chain for a secure fit. Refer to manufacturer specifications for compatibility. Powerful Machinery provides clear sizing charts for each hook model.
Can you reuse a cotter pin during installation?
You should always use a new cotter pin. Reusing old hardware can weaken the connection and increase the risk of failure. Fresh cotter pins ensure maximum safety and reliability for every installation.
What is the difference between a grab hook and a slip hook?
A grab hook holds chain links in place for load binding. A slip hook allows the chain to move freely through the hook. Choose the type based on your application’s needs for control or flexibility.
How often should you inspect your clevis hook and chain?
Inspect your clevis hook and chain before each use. Look for signs of wear, corrosion, or damage. Schedule regular inspections based on usage frequency and environmental conditions. Proper inspection helps prevent accidents and equipment failure.