Want to make sure your project stays safe and secure? Start by picking the right eye bolts and prepping your installation site. When you use Powerful Machinery’s Stainless Steel Eye Bolts, you get tough, corrosion-resistant hardware trusted on job sites everywhere.
You’ll see them used for lifting machinery, securing scaffolding, tightening cables, and anchoring loads in marine or construction settings. Always follow safety guidelines, double-check your tools, and pay close attention to alignment for the best results.
Key Takeaways
Choose the right type of eye bolt for your project. Bent wire eye bolts are for light loads, while lifting eye bolts handle heavy-duty tasks.
Always check the working load limit (WLL) of your eye bolts. This ensures safety and prevents accidents during lifting.
Follow proper installation steps. Pre-drill holes, use washers, and ensure the eye bolt sits flush for maximum strength.
Inspect eye bolts regularly for wear or damage. This helps maintain safety and reliability in your lifting operations.
Use stainless steel eye bolts for outdoor or marine projects. Their corrosion resistance makes them ideal for tough environments.
Types of Eye Bolts
When you start a project that needs secure fastening, you want hardware you can trust. Powerful Machinery’s Stainless Steel Eye Bolts give you that peace of mind. These bolts work in all sorts of environments, from construction sites to marine docks.
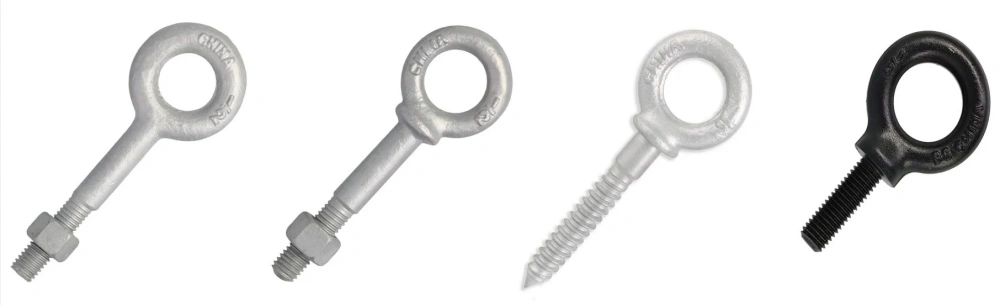
Let’s break down the main types of eye bolts you’ll find and see where each one shines.
Bent Wire Eye Bolts
Bent wire eye bolts are simple and lightweight. You often use them for hanging light fixtures or guiding wires. They’re made from a single piece of wire bent into a loop. Because of their design, they’re not built for heavy lifting. If you try to use them for big loads, they can open up or bend.
Here’s a quick look at how they compare to stronger options:
Type of Eye Bolt | Design Characteristics | Strength Characteristics |
|---|---|---|
Bent Wire Eye Bolts | Used for lighter-duty applications; prone to opening under heavy loads; not suitable for angular loads. | Weaker; not recommended for heavy lifting. |
Forged Eye Bolts | Hammered or pressed into form, enhancing the metal grain structure. | Significantly stronger; can withstand loads up to the tensile strength of the material; suitable for heavier-duty applications. |
Tip: Only use bent wire eye bolts for light-duty jobs. For anything heavier, go with a forged or stainless steel option.
Lifting Eye Bolts
Lifting eye bolts are your go-to for heavy-duty lifting. You’ll see them used to hoist engines, anchor machinery, or secure cargo. These bolts come in different sizes and can handle loads up to 7 tons, depending on their diameter and design. Always check the rated load before you start lifting.
Nut Eye Bolts
Nut eye bolts have threads that run the full length of the shaft. You use a nut to secure them on the back side of your material. These bolts work well when you need a strong anchor point through beams or thick panels. They’re great for both lifting and lashing tasks.
Plain Pattern Eye Bolts
Plain pattern eye bolts have a simple, straight shank with a loop at the end. You’ll use these for vertical loads where the pull is straight. They’re easy to install and work best in wood or softer materials.
Shoulder Pattern Eye Bolts
Shoulder pattern eye bolts have a flat shoulder under the eye. This design lets you use them for angular loads, not just straight pulls. You’ll want these when you need to lift at an angle or secure something that might shift.
Swivel Hoist Rings
Swivel hoist rings take things up a notch. They rotate and pivot, so you can lift from any direction without twisting the bolt. These are perfect for complex rigging jobs or when you need extra flexibility.
Note: No matter which type you choose, Powerful Machinery’s Stainless Steel Eye Bolts meet international standards and deliver reliable performance for all your lifting, lashing, and rigging needs.
Guide to Eye Bolt Selection
Choosing the right eye bolt can make or break your project. You want to keep your load secure, your team safe, and your hardware working for years. This guide to eye bolts will walk you through the most important factors so you can pick the best option every time.
Load Conditions
Before you grab any eye bolt, think about the weight and direction of your load. Not all bolts are created equal. Some are built for straight pulls, while others handle angled lifts. Here’s what you should check:
Inspect each bolt for wear, rust, or damaged threads.
Pick the right shank length for your setup.
Use more than one bolt if your load might swing or move.
Always check the Working Load Limit (WLL) stamped on your hardware.
Keep the load lined up with the eye bolt’s axis.
Never run a sling from one bolt to another. That can create dangerous side forces.
Make sure hooks and shackles fit freely inside the eye.
Lift slowly to avoid shock loading.
Prevent the load from spinning, which can damage the bolt.
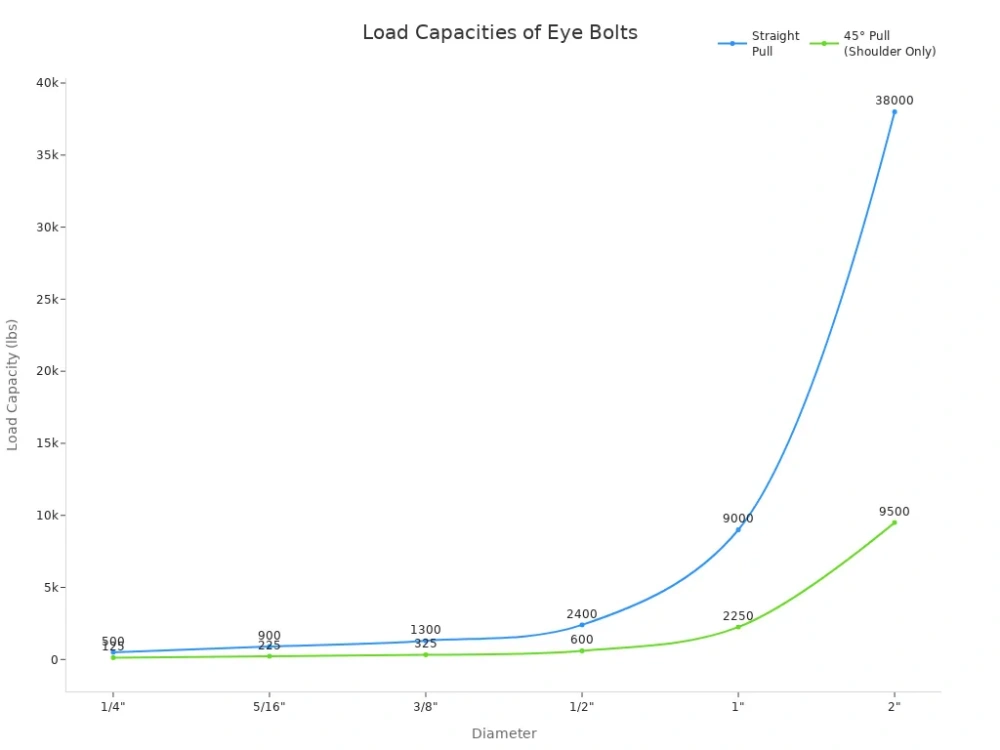
If you plan to lift at an angle, you need shoulder eye bolts. The rated load drops as the angle increases, so always stay within the safe limits.
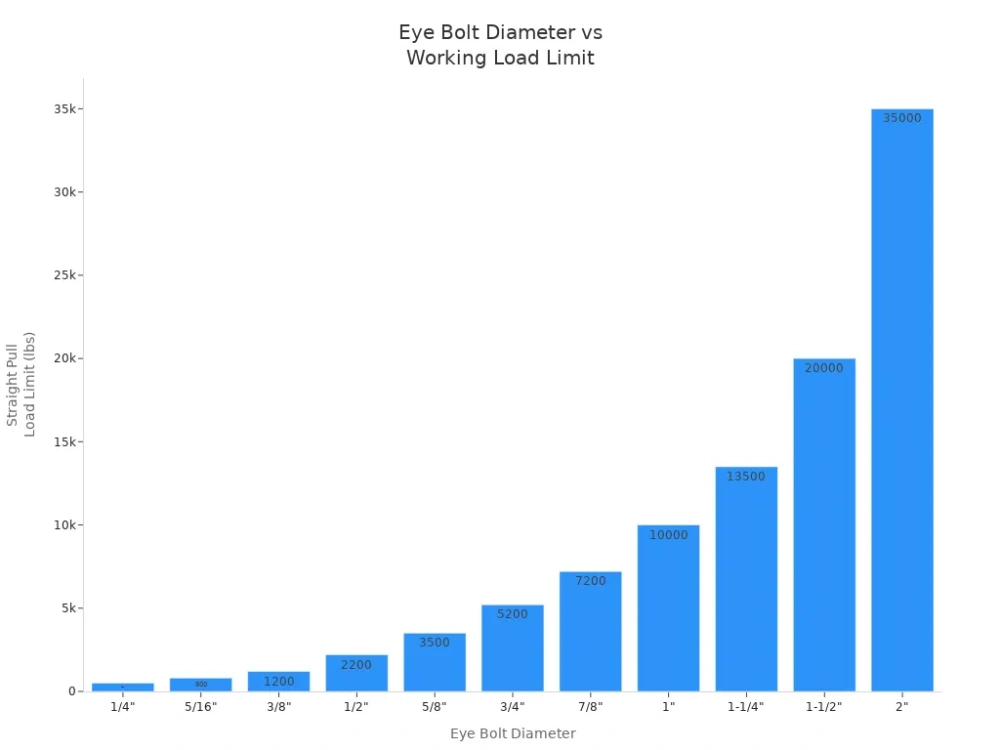
Eye Bolt Diameter | Straight Pull (lbs) |
|---|---|
1/4″ | 500 |
5/16″ | 800 |
3/8″ | 1,200 |
1/2″ | 2,200 |
5/8″ | 3,500 |
3/4″ | 5,200 |
7/8″ | 7,200 |
1″ | 10,000 |
1-1/4″ | 13,500 |
1-1/2″ | 20,000 |
2″ | 35,000 |
Tip: Never use a standard non-shoulder eye bolt for an angled lift. Always inspect your bolts before use and keep them tight and flush with the surface.
Application Scenarios
You’ll find eye bolts in all sorts of places—wood beams, concrete walls, and even ceilings. Each setup needs a different approach:
For wood, use an eye bolt with a square strut washer and a jam nut. This combo can hold up to 300 lbs when threaded into a 1/2″ strut nut.
In ceilings, a 1/2″ eye bolt works well with pulley systems for lifting heavy items.
For concrete, pair a 3/8″ drop-in anchor with your eye bolt to secure strut or hardware.
Lifting eye bolts are perfect for heavy-duty jobs like hoisting engines or anchoring machinery. Always match the bolt type to your project’s needs. If you’re not sure, check the manufacturer’s recommendations or ask an expert.
Material Compatibility
The material you’re working with matters just as much as the bolt itself. You want a bolt that matches your environment and holds up over time.
Aspect | Description |
|---|---|
Material | Choose an eye bolt that works with your base material—wood, concrete, or metal. |
Corrosion Resistance | Stainless steel eye bolts resist rust and work well indoors, outdoors, and even in marine settings. |
Stainless steel eye bolts stand out for their corrosion resistance. They’re a smart pick for outdoor, marine, or chemical environments. Their alloy makeup keeps them strong, even if they get scratched or exposed to harsh weather.
Always consider the load-bearing capacity of your bolts.
Make sure your hardware meets lifting eye bolt standards for safety.
Powerful Machinery’s stainless steel eye bolts meet top international standards like ASTM A489, DIN 580, and DIN 582. You get peace of mind knowing your hardware is tested and certified for tough jobs.
No matter your project, you’ll find a size and style that fits—whether you’re working on a construction site, a ship, or a warehouse.
Note: When you choose Powerful Machinery, you’re picking eye bolts trusted by pros around the world for strength, safety, and versatility.
Eye Bolt Installation
Getting your eye bolts installed the right way makes all the difference in safety and performance. Whether you’re working with wood, concrete, or ceilings, you want to make sure every step is solid.
Let’s walk through the tools you’ll need, best practices, and step-by-step guides for each material. You’ll also see how Powerful Machinery’s stainless steel eye bolts fit right into your lifting and rigging equipment setup.
Eye Bolt Installation Tools
Before you start, gather your tools. Good installation preparation saves time and helps you avoid mistakes. Here’s what you’ll need for most jobs:
An electric drill with the right drill bits
Wrench or adjustable spanner
Thread locker (for extra security)
Safety gloves and goggles
Measuring tape or ruler
Washers or shims (if needed)
Pencil or marker for marking holes
If you’re using lifting eye bolts for heavy-duty projects, double-check that your tools match the bolt size and material. Powerful Machinery’s stainless steel eye bolts work well with standard hand tools and power drills.
General Best Practices
You want your eye bolts to stay put and handle the load. Follow these best practices to get the strongest hold and safest results:
Check the hole size before you start. The bolt should fit snugly without forcing it.
Make sure the shoulder of the eye bolt sits flush with the surface. Use washers or shims if you need to, but keep at least 90% of the threads engaged.
Always apply the load in the plane of the eye. This reduces bending and keeps the bolt strong.
For blind tapped holes, aim for thread engagement that’s at least 1.5 times the bolt diameter in steel, or 2.5 times in aluminum.
Tighten nuts securely against the load. You want 1 to 1.5 threads showing past the nut for the best grip.
Install the shoulder at a right angle to the hole’s axis. This gives you full contact and maximum strength.
Tip: Take your time with installation preparation. A few extra minutes now can prevent accidents and equipment failure later.
How to Install Eye Bolts in Wood?
Wood is a common spot for eye bolts, especially when you need to hang or anchor something. Here’s how you do it:
Gather your tools: eye bolt, drill, wrench, thread locker, and safety gear.
Pick a solid spot in the wood that can handle the weight.
Drill a pilot hole that matches the diameter of the bolt’s threads. This helps prevent the wood from splitting.
Line up the eye bolt with the hole. Screw it in by hand until it gets tight.
Use a wrench to finish tightening. Make sure the eye sits flush with the wood.
Add a thread locker if you want extra security, especially for heavy loads or outdoor use.
Test the eye bolt by gently pulling on it. Make sure it doesn’t wiggle or loosen.
Note: Powerful Machinery’s stainless steel eye bolts resist rust, so they’re perfect for outdoor wood projects or places with lots of moisture.
How to Install an Eye Bolt in Concrete?
Concrete needs a different approach. You want a secure anchor that won’t pull out under stress. Here’s your step-by-step guide:
Mark the spot where you want the eye bolt.
Use a hammer drill with a masonry bit to drill a hole that matches your anchor size.
Clean out the dust from the hole. A vacuum or brush works well.
Insert a drop-in anchor or expansion anchor into the hole.
Tap the anchor in until it’s flush with the surface.
Thread the eye bolt into the anchor. Tighten it with a wrench until it’s snug.
Check that the eye bolt sits straight and doesn’t wobble.
Tip: For lifting and rigging equipment in concrete, always use anchors rated for the load. Powerful Machinery’s eye bolts pair well with high-quality anchors for maximum safety.
How to Install Eye Bolt in Ceiling?
Ceiling installations are common for hanging lights, plants, or even lifting gear. Here’s how you can do it safely:
Find a ceiling joist or beam. Use a stud finder if you need help.
Mark your spot and drill a pilot hole that matches the bolt’s threads.
Insert the eye bolt by hand, then use a wrench for a tight fit.
If you’re working with drywall or plaster, use a toggle bolt or ceiling anchor for extra support.
Make sure the eye bolt sits flush and points in the direction of the load.
Note: Always check the weight rating of your ceiling and hardware. For heavy-duty lifting and rigging equipment, use only certified eye bolts like those from Powerful Machinery.
How to Screw in an Eye Bolt With a Drill?
Using a drill can make installation faster and easier, especially if you have a lot of bolts to install. Here’s what you need to know:
Attach the right-sized driver or bit to your drill.
Line up the eye bolt with the pre-drilled hole.
Use the drill on a low speed to screw in the bolt. Stop when the eye sits flush with the surface.
Double-check alignment to avoid stripping threads or damaging the material.
Here’s a quick look at the pros and cons of using a drill for this job:
Advantages of Using Drill Screws | Limitations of Using Drill Screws |
|---|---|
Efficiency: Saves time and effort. | Material Limitations: Not ideal for very hard surfaces. |
Versatility: Works on wood and metal. | Cost: Drill screws can be pricier. |
Fewer Tools Needed: Simplifies your setup. | Skill Requirement: Needs careful alignment. |
Consistent Results: Gives a reliable finish. |
Tip: If you’re new to using a drill for eye bolts, practice on a scrap piece first. This helps you get a feel for the right speed and pressure.
When you select and use eye bolts from Powerful Machinery, you get hardware that’s easy to install and built for tough jobs. Good installation preparation and the right tools make every project safer and more reliable.
Working Load Limit & Safety
When you work with eye bolts, you need to know exactly how much weight they can handle. The working load limit is the maximum weight an eye bolt can safely support during normal use.
Manufacturers set this number after testing and calculations. They always set the working load limit much lower than the breaking strength to keep you safe, even if something unexpected happens. Factors like material, diameter, and load angle all affect the load capacity and load ratings.
Inspection and Preparation
Before you install lifting eye bolts, take time for a careful eye bolt inspection. Look for any signs of wear, corrosion, or damage. Always pre-drill holes to the right size for a snug fit. Use washers and nuts to spread the load evenly if you’re working with through holes.
Make sure to fasten bolts to the correct torque. Check that the eye bolt lines up with the load. Regular inspections help you spot problems early and keep safety during use a top priority.
Step | Description |
|---|---|
Pre-Drill Holes | Drill holes to the right size for a snug fit. |
Utilize Washers and Nuts | Use washers and nuts to spread the load evenly. |
Torque Specifications | Tighten bolts to the recommended torque. |
Check Alignment | Make sure the eye bolt lines up with the load. |
Routine Inspections | Check for wear, corrosion, or damage often. |
Load Alignment
Proper load alignment is key for safety compliance and critical performance requirements. Always keep the load in the same plane as the eye. If you pull at an angle, you reduce the rated capacity and risk failure. Different types of eye bolts are made for different load directions, so pick the right one for your job.
Tip: Never run a sling from one eye bolt to another. This creates side loads and lowers the working load limit.
Manufacturer Guidelines
Follow the manufacturer’s instructions and OSHA safety standards every time. Here’s a quick guide:
Requirement | Description |
|---|---|
Installation | Seat eye bolts flush against the surface. |
Load Alignment | Keep loads in the plane of the eye. |
Inspection | Check for defects before each use. |
Safety Precautions | Never exceed the rated capacity. Don’t shock load or weld eye bolts. |
Destruction | Destroy any damaged or altered eye bolts. |
Powerful Machinery’s certified products meet strict international standards, so you can trust their load ratings and working load limit for every lift.
Torque for Swivel Hoist Rings
When you install swivel hoist rings, always tighten them to the torque value stamped on the ring. This prevents problems from over-tightening or under-tightening.
Check the torque regularly, since bolts can loosen over time. Following these steps helps you meet safety compliance and keeps your lifting eye bolts working at their best.
Conclusion
You want every lift to be safe and secure. Start by choosing the right eye bolts for your job, then follow each installation step carefully. Here’s a quick safety checklist:
Safety Consideration | Description |
|---|---|
Load Capacity | Never exceed the working load limit. |
Proper Alignment | Keep bolts in line with the load. |
Accessories | Use washers and nuts for stability. |
Thread Engagement | Engage in at least 90% of threads. |
Inspection | Check for damage before each use. |
Industry pros trust stainless steel eye bolts for their durability and corrosion resistance. Always read manufacturer instructions and follow safety standards like ASME and ASTM. Regular inspections keep your setup reliable for years.
FAQ
How do I know which eye bolt size to use?
Check your load weight and the material you’re working with. Always match the eye bolt’s working load limit to your needs. If you’re unsure, look at the manufacturer’s chart or ask an expert.
Can I use stainless steel eye bolts outdoors?
Absolutely! Stainless steel eye bolts resist rust and corrosion. You can use them for outdoor projects, marine jobs, or anywhere moisture is a concern.
Do I need special tools to install eye bolts?
You usually need a drill, wrench, and safety gear. For concrete or ceilings, you might need anchors or a hammer drill. Powerful Machinery’s eye bolts work with standard tools.
How often should I inspect my eye bolts?
Inspect your eye bolts before every use. Look for signs of wear, rust, or damage. Regular checks help you catch problems early and keep your setup safe.