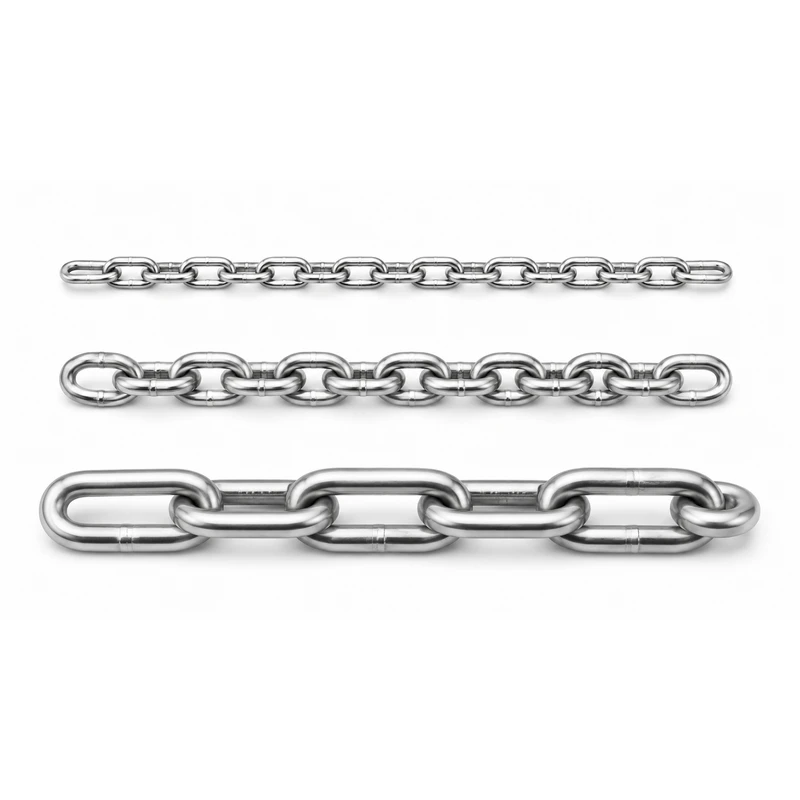
Connecting rope to anchor chain sounds straightforward until you ask the question that changes the method: does the join need to pass through a windlass? If you will retrieve the rode by hand and want a removable connection, you can tie an Anchor Hitch – also called an Anchor Bend or Fisherman’s Bend – to the last chain link or to a properly sized shackle.
If the rode must travel through a rope-and-chain windlass, you will usually need a splice designed for the rope construction and the gypsy.
The difference is practical, not just technical. A well-dressed Anchor Hitch can hold securely, but it leaves a bulky join and may tighten hard after loading. A correctly made splice creates a smoother transition, so the rope and chain are less likely to catch at the bow roller or windlass.
This guide shows you how to tie a rope to an anchor chain with an Anchor Hitch, how to check the finished knot, and when you should choose a splice instead.
Quick Answer
Tie an Anchor Hitch to a smooth, correctly sized end link when you need a removable connection and will handle the rode manually. If the rope-to-chain connection must pass through a combination windlass, use the splice specified for your rope construction, chain calibration, and windlass gypsy.
Anchor Knot Terminology: Anchor Hitch, Anchor Bend, and Anchor Knot
Boaters often use “anchor knot” as a general search term, but the direct rope-to-chain method in this guide is the Anchor Hitch. It is also commonly called the Anchor Bend, and some references use Fisherman’s Bend for the same knot family.
The names vary, but the job here is specific: fasten the working end of the anchor rope to a smooth chain end link or an appropriate shackle with two round turns and a secured finishing hitch. This page uses Anchor Hitch as the primary name so the steps stay clear.
Key Takeaways
- Use an Anchor Hitch when you need a simple, removable connection and you will handle the anchor rode manually.
- Use a rope-to-chain splice when the connection must pass through a combination rope-and-chain windlass.
- Match the rope, chain link dimensions, and windlass gypsy before you make the connection.
- Secure the working end of the knot with an extra half hitch or seizing, then test the connection under controlled load.
- Inspect the rope where it touches the chain because corrosion, burrs, and movement can cause hidden chafe.
Should You Tie the Rope or Splice It to the Chain?
Before you pick up the rope, look at how your anchoring system works. The best connection depends on whether the join must move through a windlass, how often you disconnect the rope, and what type of rope you use.
| Your setup | Recommended connection | Why |
| You haul the rode by hand | Anchor Hitch to the end link or shackle | Quick to tie, easy to inspect, and requires no splicing tools |
| You need a temporary or emergency connection | Anchor Hitch with a secured tail | Can be tied onboard with basic rope-handling skills |
| You use a combination rope-and-chain windlass | Manufacturer-approved rope-to-chain splice | Creates a smoother transition through the gypsy |
| You use a chain-only gypsy and a separate capstan for rope | Spliced eye, thimble, and shackle may be suitable | The hardware does not need to pass through a combination gypsy |
| You use 8-plait or double-braid anchor rope | Use the rope maker’s specified splice | These constructions require a different method from 3-strand rope |
If you are still deciding how much chain and rope your system needs, review our anchor chain vs. rope guide before making the connection.
Important: Do not assume that any knot, splice, chain, and windlass combination will work together. Check the windlass manual for the required chain calibration, rope diameter, and rope construction.
What You Need Before Tying the Rope to the Anchor Chain?
You do not need many tools for an Anchor Hitch, but preparation makes the finished connection safer and easier to inspect.
- A clean, undamaged nylon anchor rope
- A compatible anchor chain with a sound end link
- Gloves to protect your hands
- Whipping twine for seizing the tail, if required
- A knife or rope cutter for trimming damaged fibers
- Fresh water and a brush for cleaning the end link
Start by checking the last several chain links. Look for heavy rust scale, sharp edges, welding spatter, distortion, or a link that has worn noticeably thinner than the others. The rope will bear directly against the metal, so even a small burr can work through rope fibers as the boat moves.
Check the rope in the same way. If the end is stiff, glazed, cut, flattened, or contaminated with oil, move back to sound material before tying the knot. You should not hide damaged rope inside a knot.
Tip: If the last chain link is too small for the rope to pass through without crushing or twisting, do not force it. Use a suitable connection method or specify a large end link when ordering the chain.
How to Tie a Rope to an Anchor Chain With an Anchor Hitch?
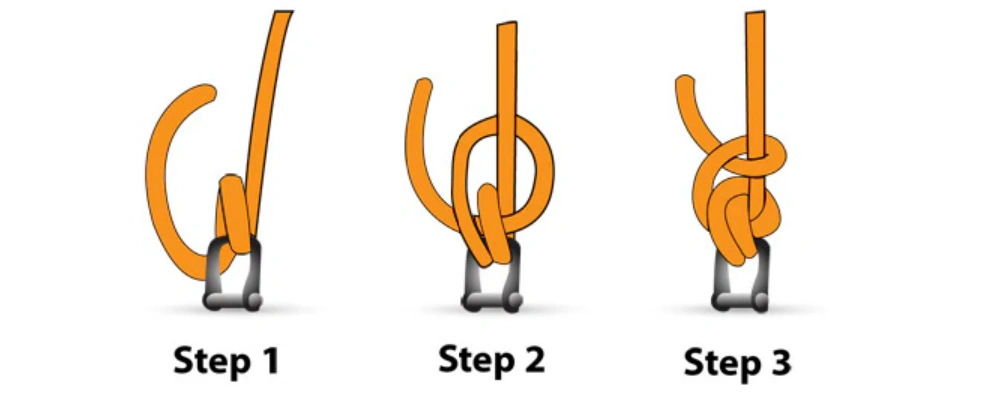
The Anchor Hitch is a practical answer when you want to know how to tie a rope to an anchor chain without making a permanent splice. You can tie it directly to the final chain link, provided the link is large enough and smooth enough, or to an anchor-rated shackle connected to the chain.
For the steps below, the standing part is the long section of rope leading back to your boat. The working end is the short free end you use to form the knot.
Step 1: Pass the Rope Through the End Link Twice
Feed the working end through the last chain link. Bring it around and pass it through the same link a second time, creating two neat round turns around the metal.
Keep the turns side by side instead of crossing them. These turns spread the load and reduce movement at the chain link. Leave a generous working end so you have enough rope to complete the hitch and secure the tail.
Step 2: Bring the Working End Behind the Standing Part
Take the working end behind the standing part of the rope. Bring it back toward the two round turns you formed around the chain link.
At this point, keep the standing part under light tension. You want the turns to stay orderly, but you should still have enough slack to feed the working end through them.
Step 3: Pass the Working End Through the Round Turns
Feed the working end under both round turns, entering from the side closest to the standing part. Pull the working end through until the main part of the Anchor Hitch begins to form against the chain link.
Dress the knot before you tighten it. The two round turns should remain parallel, and the working end should sit cleanly without trapping crossed sections of rope.
Step 4: Finish With a Half Hitch
Take the working end around the standing part and tie a half hitch. Pull it snug against the main knot.
For a connection that may be exposed to vibration or repeated cycling, add a second half hitch in the same direction or seize the working end to the standing part with whipping twine. Leave enough tail beyond the final hitch so the knot can settle without pulling the end through.
Step 5: Set and Test the Knot
Tighten the knot gradually by pulling the standing part while holding the chain steady. Do not jerk the rope. Watch the knot as it beds down and make sure the turns do not cross or roll out of position.
Next, apply a controlled test load. Check that:
- The two turns stay seated against the chain link.
- The main hitch does not capsize or shift.
- The half hitch remains snug.
- The tail does not shorten excessively.
- The chain link does not cut, pinch, or sharply bend the rope.
Once the knot has carried load, it may become difficult to untie. That is normal for many heavily loaded hitches, but it is one reason you should not use this method where the join must run through a windlass.
Remember: Knowing how to tie a rope to an anchor chain is only part of the job. You also need to inspect the connection after it has been loaded, not just when it is freshly tied.
What Should the Finished Anchor Hitch Look Like?
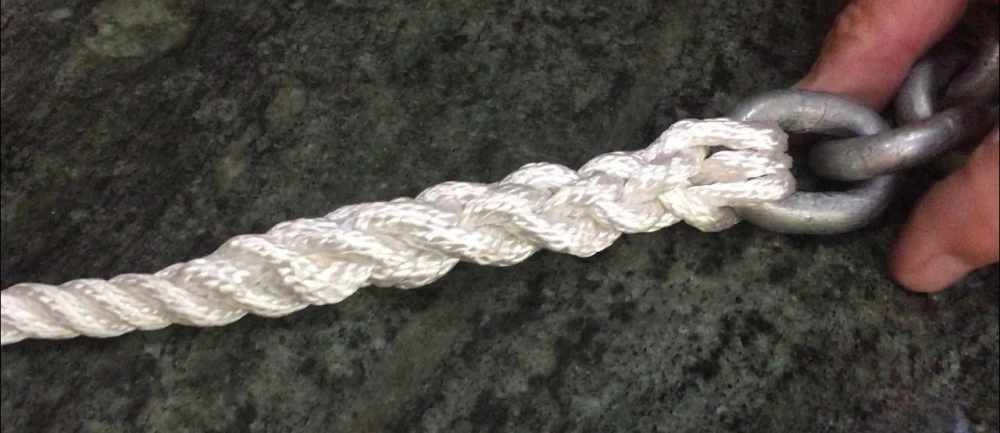
A correctly dressed Anchor Hitch should look compact and deliberate. You should see two even turns around the end link, the working end passing through those turns, and one or two finishing half hitches around the standing part.
You should not see:
- Crossed or overlapping turns
- A very short tail
- Rope fibers pinched against a sharp weld
- A half hitch sitting far away from the main knot
- A knot tied around several loose chain links at once
- A connection that must be forced through the windlass
If the knot looks untidy before you load it, untie it and start again. A few extra minutes at the dock are better than trying to correct a slipping or jammed connection while the boat is moving.
Common Mistakes When Tying Rope to Anchor Chain
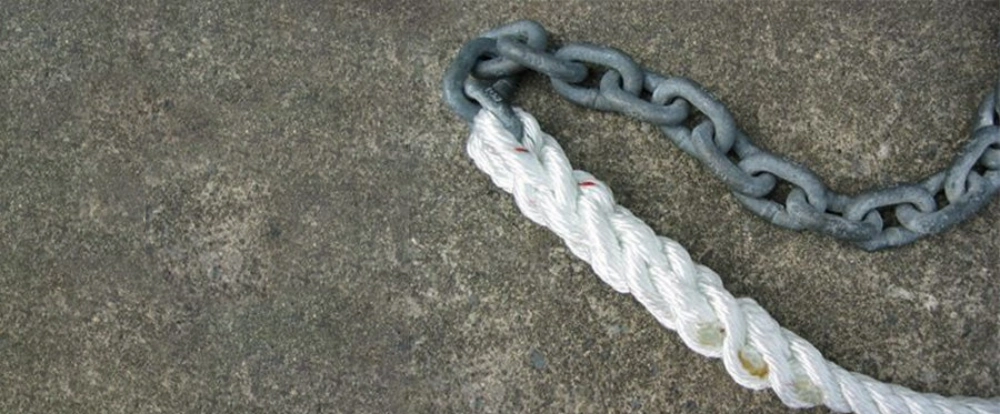
Using the Knot With a Combination Windlass
An Anchor Hitch creates a bulky section that normally will not travel cleanly through a rope-and-chain gypsy. It can jam, damage the rope, or prevent the windlass from gripping the rode correctly. Use the splice specified by your equipment manufacturer instead.
Tying to a Rough or Corroded Link
Rust scale and damaged galvanizing can become abrasive. Movement between the rope and the link then saws at the rope fibers. Clean and inspect the link, and replace chain that has lost significant section or become distorted.
Leaving Too Little Tail
The knot will settle when it first takes load. If you leave only a short tail, that settling can reduce your safety margin. Leave a practical tail and secure it so you can inspect it easily.
Choosing a Rope That Is Too Large for the Link
A rope should not be crushed into an undersized opening. Tight bends and pinching concentrate stress and make inspection difficult. Check the actual internal dimensions of the end link, not only the nominal chain diameter.
Treating the Knot as a Permanent, Maintenance-Free Join
Every rope-to-metal connection wears. Salt, sand, mud, and repeated loading can damage the rope at the exact point hidden inside the hitch. Untie and inspect the connection on a regular schedule.
When a Rope-to-Chain Splice Is the Better Choice?
If your anchor rode runs through a combination windlass, a splice is normally the right connection. A rope-to-chain splice keeps the profile much smoother than a knot or a shackle. This helps the rope move from the gypsy into the chain locker with less interruption.
A splice is also useful when you want a permanent anchor rode and do not need to separate the rope and chain frequently. However, the splice must match the rope construction. A 3-strand Class I rope, an 8-plait rope, and a double-braid rope do not use the same instructions.
General 3-Strand Rope-to-Chain Splice Overview
The following overview helps you understand the process, but you should follow the exact instructions supplied by your rope and windlass manufacturers.
- Count back the required number of rope picks and secure the standing rope with tape or whipping.
- Unlay the three strands to the marked point and tape the end of each strand.
- Arrange the strands at the final chain link, with one strand passing through from one side and the other two passing through from the opposite side, as specified by the splice instructions.
- Pull the rope shoulder firmly against the chain link so the strands share the load evenly.
- Tuck each strand back into the standing rope in the required over-and-under sequence.
- Complete the specified number of full tucks, then taper the strands only if the rope maker’s method calls for it.
- Trim and finish the strand ends, then test the splice under a controlled load.
The finished splice should be firm, symmetrical, and free from twisted strands. It should pass through the windlass smoothly during a low-load test before you rely on it for anchoring.
Note: If you are not confident making the splice, have a qualified rigger or marine service shop do it. A professional splice is inexpensive compared with the cost of losing an anchor, damaging a windlass, or putting the vessel at risk.
How to Match the Rope, Chain, and Windlass?
A secure connection starts with compatible components. You cannot select the rope diameter from the chain grade alone. You need to consider the chain’s wire diameter, pitch, link width, end-link opening, and calibration, as well as the windlass gypsy profile.
Choose the Right Rope
Nylon is widely used for anchor rodes because it stretches under load and helps absorb shock from waves, wind, and vessel movement. Common constructions include:
- 3-strand nylon: Easy to inspect and generally the simplest construction to splice.
- 8-plait nylon: Flexible and often stores more neatly in a compact anchor locker, but it requires a specific splice.
- Double-braid rope: Comfortable to handle, but not every product is approved for a rope-to-chain windlass or direct chain splice.
Do not substitute a low-stretch rope simply because it has a high breaking strength. Your complete anchoring system needs controlled elasticity as well as strength.
Match the Chain to the Windlass Gypsy
Two chains with the same nominal diameter can have different pitch and link dimensions. Your windlass may accept only specific DIN, ISO, BBB, G4, or other calibrated chain dimensions. Incorrect chain can jump, ride up, or wear the gypsy.
Use our anchor chain size guide to understand the main selection factors, then confirm the final dimensions in your windlass manual.
Check the End Link
The last link must accept the intended knot or splice without cutting or crushing the rope. For manufactured anchor-chain assemblies, a larger end link can make connection and inspection easier. When you request a custom chain, specify the end-link dimensions and the rope or hardware that must pass through it.
Why the clear opening matters: nominal chain diameter does not tell you how much usable space remains inside the end link. Confirm the internal length and width after manufacturing tolerances and coating are considered. The rope should pass through without being flattened, forced against a weld, or bent around a sharp edge.
Also check the link’s bearing surface: a smooth, generous radius is easier on rope fibers than a narrow or damaged contact point. If a thimble or shackle is used, verify its fit separately rather than assuming that a larger end link makes every component compatible.
Select the Chain Material and Finish
Galvanized and stainless anchor chains have different corrosion, cost, inspection, and compatibility considerations. This connection guide does not duplicate those selection details; compare them in our anchor chain material guide, then confirm the finish and surrounding metals for your service environment.
How to Inspect and Maintain the Connection?
Your rope-to-chain connection works in one of the harshest parts of the anchor rode. It sees saltwater, grit, cyclic loading, abrasion, and repeated wet-and-dry exposure.
Before each trip or anchoring operation:
- Check the visible rope for cuts, hard spots, glazing, or discoloration.
- Check the finishing hitches or seizing.
- Inspect the chain link for sharp edges, corrosion, and distortion.
- Confirm that shackles are correctly sized and secured, if used.
- Run the rode under light load and watch the connection move through the deck gear.
At regular service intervals, untie the hitch or expose the splice so you can inspect the hidden contact area. Rinse salt and sediment away with fresh water. Replace the rope or remake the splice if you find broken fibers, deep abrasion, stiffness, or heat damage.
For the chain section, follow a documented anchor chain maintenance routine and replace links that no longer meet the vessel, equipment, or manufacturer’s acceptance criteria.
Do not let the windlass carry the full anchoring load for extended periods. Use the anchoring arrangement recommended for your vessel, such as a properly sized cleat, chain stopper, snubber, or bridle.
Choosing an Anchor Chain for a Reliable Rope Connection
The connection is only as reliable as the chain link that supports it. As an anchor chain manufacturer, Powerful Machinery can supply stud link and studless anchor chains in different materials, finishes, sizes, and end-link configurations for marine and offshore requirements.
You can choose a studless anchor chain when your system benefits from a more flexible link arrangement, or review our stud link chain options for demanding ship and offshore anchoring applications. The correct choice depends on the vessel, windlass, applicable standard, and required proof or certification documents.
When you request a quotation, provide:
- Chain type and applicable standard
- Nominal diameter and grade
- Required length
- Finish or coating
- Windlass or wildcat dimensions
- Anchor and shackle details
- Rope diameter and construction
- Required end links or joining links
- Inspection and certification requirements
This information allows the chain and connection points to be produced around your actual system instead of forcing a generic chain to fit after delivery.
FAQ
How do you connect anchor rope to chain?
For a removable, manually handled connection, pass the rope twice through a smooth end link, form an Anchor Hitch, secure the tail, dress the turns, and test it under controlled load. If the connection must pass through a combination windlass, use the rope manufacturer’s compatible rope-to-chain splice instead. The correct method depends on the rope construction, chain dimensions, and windlass gypsy.
What is the best knot for anchor rope when a chain is attached?
For a manually handled or temporary rope-to-chain connection, the Anchor Hitch is one of the most suitable choices. It uses two turns around the end link and finishes around the standing part, creating a compact hitch that is easy to inspect. It is not the best choice when the join must pass through a combination windlass; use a compatible splice in that system.
Can you use a bowline to attach anchor rope to chain?
A bowline can form a fixed loop, but it is usually not the preferred direct connection to an anchor chain. The loop may move and chafe on the link, and the knot creates a bulky transition. An Anchor Hitch is better suited to fastening directly to a ring, shackle, or chain end link.
Can an Anchor Hitch pass through a windlass?
You should not expect an Anchor Hitch to pass safely through a combination rope-and-chain windlass. Use a compatible rope-to-chain splice and test it with the exact gypsy fitted to your boat.
Can you attach the rope with a thimble and shackle?
Yes, a spliced eye with a thimble and a correctly sized shackle can be a practical connection when the hardware does not need to pass through a combination gypsy. Confirm that the shackle, thimble, rope, and chain have compatible dimensions and load ratings. You can read more in our anchor shackle guide.
What rope works best with an anchor chain?
Nylon is a common choice because its elasticity helps absorb shock loads. Select the construction and diameter recommended for your vessel and windlass. Three-strand nylon is straightforward to splice, while 8-plait often handles and stores well in anchor lockers.
How much anchor chain should you use before the rope?
The answer depends on your boat, water depth, bottom conditions, weather, and anchoring method. Review our guide on how much anchor chain you need and confirm the final rode design with the vessel or equipment manufacturer.
How often should you remake a rope-to-chain splice?
There is no single interval for every boat. Inspect the splice frequently and remake it when you see abrasion, broken fibers, stiffness, distortion, or excessive wear where the rope contacts the chain. Boats that anchor often or operate in sandy, muddy, or high-load conditions need more frequent inspection.
Conclusion
When you learn how to tie a rope to an anchor chain, start by choosing the right connection for your equipment. Use an Anchor Hitch for a clean, manually handled connection. Form two neat turns around the end link, pass the working end through the turns, finish with a half hitch, secure the tail, and test the knot under controlled load.
For a permanent anchor rode that must travel through a combination windlass, use the correct rope-to-chain splice instead. Match the chain calibration, rope construction, rope diameter, and gypsy specifications before you begin.
A good knot cannot compensate for a damaged rope, a rough chain link, or mismatched equipment. Inspect the complete system, use compatible components, and replace worn parts before they become the weak point in your anchoring setup.
If you need an anchor chain with a specified grade, finish, certification, or custom end-link arrangement, contact Powerful Machinery with your vessel and windlass requirements. We can help you select and manufacture an anchor-chain configuration that fits the rest of your anchoring system.