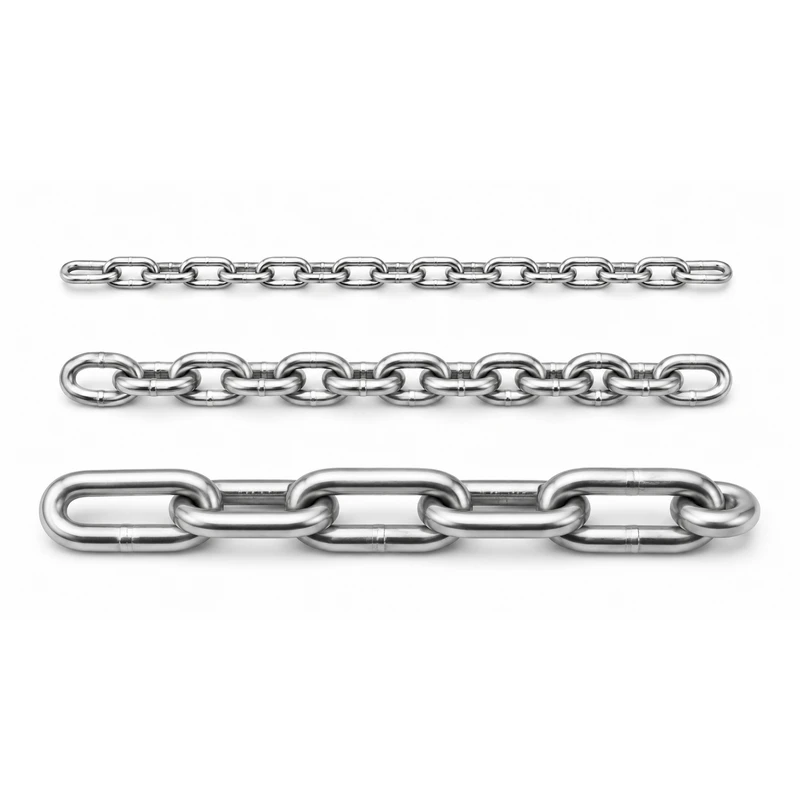
Before installing wire rope clips, identify the rope, the clip model, and the intended use. On a conventional U-bolt clip, the saddle sits on the live, load-bearing part of the rope; the U-bolt sits over the short dead end. Orientation is only one part of the installation.
The number of clips, turnback, spacing, tightening sequence, and nut torque must come from the instructions for the actual clip and rope, together with any applicable workplace requirements.
This guide explains how to prepare and inspect a clip-formed eye. It cannot replace the installation data for the specific hardware. If you cannot identify the clip or obtain the required instructions, do not put the termination into service.
What Is a Wire Rope Clip or Clamp?
In product listings, “wire rope clip” and “wire rope clamp” often mean the same U-bolt fitting: a U-bolt, a saddle (or base), and two nuts. When the rope turns back to form an eye, the main length that carries the load is the live end.
The returned tail is the dead end. A thimble, when specified, sits inside the eye and supports the rope where it meets the connecting hardware. Other fittings may also be called clips or clamps, so identify the actual design before using a U-bolt procedure.
The clips grip the two parallel lengths of rope when tightened. The finished eye depends on the rope, clip, thimble if used, and installation as a complete assembly. A clip size alone does not establish the capacity or suitability of the termination.
Identify the Clip Type Before Installation
QDPowerful’s catalogue lists DIN 13411-5, DIN 741, and DIN 1142 type malleable clips; U.S. Type G-450 drop forged clips; Italy type forged clips; and Type A, Type B, and U.S. type malleable clips. These are catalogue product names. They do not, by themselves, establish certification, lifting approval, or compatibility with another manufacturer’s installation table.
Check the marking, drawing, packaging, purchase record, and hardware against the model information. Confirm compatible rope sizes and constructions. For design differences, see the types of wire rope clips. The steps below concern installation.
Get the Installation Data Before You Start
Find the instructions for the exact clip model before forming the eye. Check the compatible rope size and construction, required clip count, turnback, clip positions and spacing, tightening sequence, nut torque, and any instructions for loading and rechecking. Confirm that the proposed application is allowed. Catalogue dimensions and figures from another brand cannot fill gaps in these instructions.
If the work falls under a rule that prescribes clip count or spacing, apply the rule to its actual scope. For example, OSHA construction rigging provision 1926.251(c)(5) calls for Table H-2 when U-bolt clips form eyes in that context. That does not authorize a clip-formed eye where the same provision prohibits it in a bridle, sling, or bull wire. Local requirements and engineered specifications may also apply.
Have the rope identification, measuring tools, suitable wrenches, and any specified torque wrench ready. Keep the installation instructions at hand. If the rope is coated or has an unusual construction, confirm compatibility before fitting clips or modifying the coating. Do not strip a coating as a routine preparation step.
How to Install Wire Rope Clips Step by Step
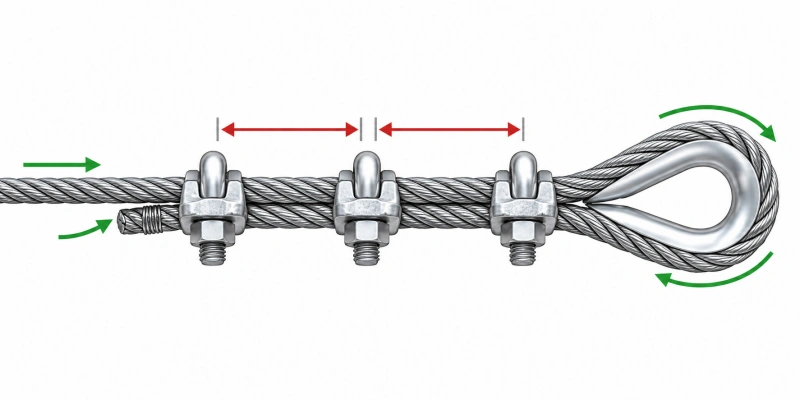
Step 1 Inspect and Measure the Wire Rope
Inspect the length that will form the eye and lie beneath the clips. Look for broken wires, corrosion, kinks, flattened strands, heat damage, or other defects. Confirm the nominal diameter and construction from the rope identification, then measure as the rope supplier directs. A crushed or worn section can give a misleading measurement. Do not form the eye over damaged rope.
Step 2: Match the Clip to the Rope and the Application
Match the identified clip model and size to the rope and intended use. Inspect the U-bolt, saddle, threads, and nuts for cracks, distortion, corrosion, missing parts, or damaged threads. Do not mix hardware or installation figures from different clip designs.
Step 3 Form the Eye and Fit the Thimble
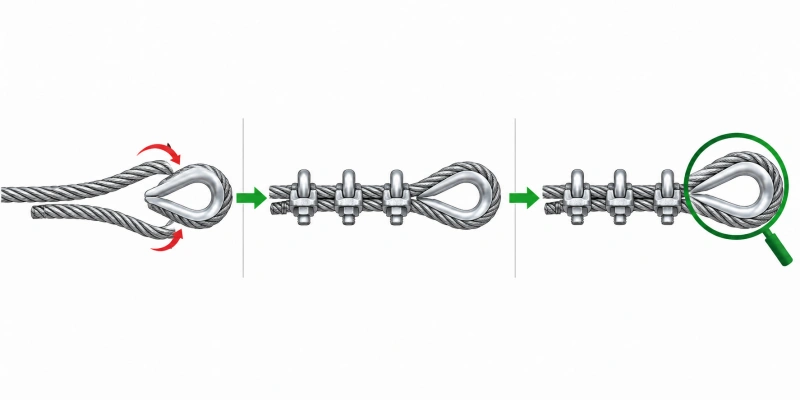
Mark the turnback from the reference points given for this clip and eye. Form the eye without kinking or distorting the rope. If the design calls for a thimble, fit one suited to the rope and mating hardware. Seat it inside the eye and check that the rope follows its curve. For more on eye hardware, see wire rope thimble designs.
Step 4: Identify the Live and Dead Ends
Trace the rope from the eye into the length that will carry the load: this is the live end. The returned tail is the dead end. On a conventional U-bolt clip, the saddle goes against the live end and the U-bolt over the dead end. Check the drawing for your actual model before tightening.
Step 5: Position the First Clip
Place the first clip where the instructions for the identified model specify. Check the marked turnback, keep the two rope lengths parallel, and follow that model’s placement and initial-tightening sequence. Do not estimate the first-clip position from a diagram for another product.
Step 6: Add the Remaining Clips
Fit the required number of clips at the positions shown in the model instructions, with each clip correctly oriented. Measure spacing from the reference points specified in those instructions. Check that the eye remains seated and the required tail extends beyond the last clip.
Step 7: Tighten Evenly to the Specified Torque
Tighten the nuts in the specified order. If the instructions give a torque value, use a suitable torque wrench and follow the stated tightening sequence for both nuts. Tightening by feel may leave uneven pressure; overtightening can damage the rope or hardware. A value for another clip is not a substitute, even at the same nominal rope size.
Step 8 Carry Out Any Required Initial Load and Recheck
If the instructions call for an initial load and a subsequent inspection or retightening, perform those steps under the site’s controlled procedure. Record the required checks and the source of any torque value. Applying an initial load does not make a prohibited or undocumented termination suitable for a lifting sling.
Step 9 Inspect Before Service
Before service, check clip orientation, count, position, nuts, required torque record, tail length, thimble fit, and rope condition. Look for crushed strands, movement at the clips, or a change in eye shape. Correct discrepancies before use. Continue inspection under the applicable site program and manufacturer instructions.
Which Way Should a Wire Rope Clip Face?
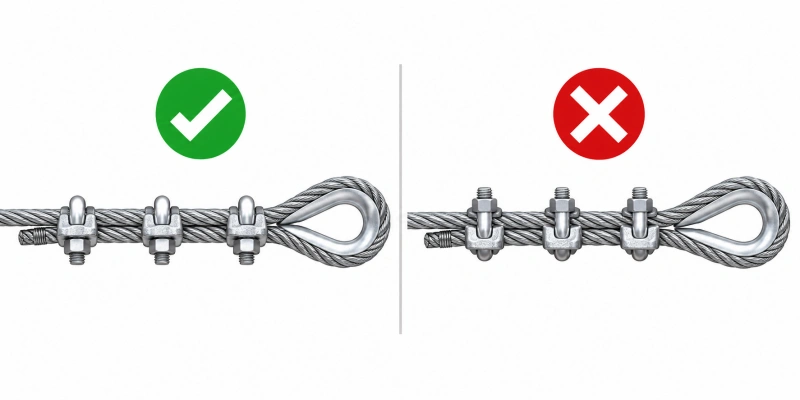
For a conventional U-bolt wire rope clip, put the saddle on the live end and the U-bolt on the dead end. The saying “never saddle a dead horse” can help you remember the orientation. OSHA’s construction rule specifies contact between the U section and the dead end in the applicable eye application; Crosby’s U-bolt instructions show the same orientation for its clips. Neither provides installation values for QDPowerful clips.
The phrase is a memory aid for a conventional U-bolt clip, not a substitute for the drawing. Other clip designs need their own installation instructions. If the load-bearing length is unclear, trace the rope path before assembling the eye.
How Many Clips Do You Need, and What Spacing and Torque?
There is no installation figure that works for every clip. Identify the model and size, rope diameter and construction, and application. Then read that model’s instructions alongside any applicable regulation or engineered specification. Check how the drawing measures spacing, and use its clip count, turnback, placement, and torque as one complete set. Do not combine figures from different sources.
The QDPowerful catalogue lists clip types and dimensions, but it does not give the installation schedule needed for a clip-count or torque table here. If you lack instructions for the actual model, obtain them before building the eye or choose a documented termination suited to the job. A generic online chart cannot verify the assembly.
Turnback Length and Thimble Fit
Turnback is the portion of rope returned alongside the live end to form the eye. Mark and measure it using the reference points specified for your clip and thimble arrangement. It needs to accommodate the required clips and leave the specified tail beyond them. Extra tail cannot compensate for the wrong clip count, orientation, or torque.
Where the design calls for a thimble, check that it fits the rope and mating hardware and remains seated in the eye. The rope should follow the thimble without pinching at its ends. A thimble protects the eye at the connection point; it does not replace the clips or establish an assembly rating.
Common Wire Rope Clip Installation Mistakes
- Reversing a conventional U-bolt clip: the saddle belongs on the live end; check the actual model drawing.
- Using a clip that does not match the rope: verify both nominal size and construction before assembly.
- Borrowing another brand’s count, spacing, turnback, or torque: use one applicable set of model instructions and any binding rule.
- Guessing the first clip position or mixing procedures: the order and location must come from the same installation method.
- Tightening unevenly, with damaged threads, or by feel when torque is required: replace defective parts and use the specified tool and value.
- Installing over worn, kinked, crushed, or incompatible coated rope: assess and correct the rope/clip compatibility first.
- Skipping a required thimble, initial-load check, or later inspection: follow the assembly’s documentation and service program.
- Assuming a completed eye is approved for a lifting sling: check the applicable restriction before the assembly is designed or used.
Inspection After Installation
Inspect from the eye toward the returned tail. Check that the thimble, if fitted, remains seated; the clips have not shifted; nuts and threads are sound; and the rope shows no crushing, broken wires, corrosion, or movement under the clips.
Compare the eye and tail with the installation record. If the site procedure requires a torque recheck, use the value and method for this exact model. Do not tighten nuts repeatedly without an instruction to do so.
Set the inspection interval from the application, service conditions, applicable rules, manufacturer instructions, and site procedure. Remove a suspect termination from service and have it assessed by a competent person before reuse.
Can Wire Rope Clips Be Used for Lifting?
Do not treat a clip-formed eye as a lifting sling by default. In U.S. construction rigging, OSHA 1926.251(c)(4)(iii) expressly prohibits forming eyes in wire rope bridles, slings, or bull wires with clips or knots. OSHA discusses other U-bolt clip eye uses separately; that does not cancel the sling prohibition.
Other jurisdictions and tasks may set different conditions, so the exact equipment, use, and governing rules must be checked.
Requirements depend on the job. A stationary support line, a crane rope, and a lifting sling are different applications. For a load-bearing application, have the responsible qualified person confirm the permitted termination, rope compatibility, manufacturer limits, and any required rating, inspection, or testing. A catalogue type name does not authorize a lifting use.
For other termination methods, see how to join steel wire rope.
QDPowerful Wire Rope Clip Options
The QDPowerful catalogue lists several U-bolt clip families, including DIN 13411-5 type, DIN 741 type, DIN 1142 type, U.S. Type G-450 drop forged, Italy type forged, and malleable Type A, Type B, and U.S. type clips. See the wire rope clips range for available sizes and dimensions. A catalogue type name alone does not establish certification, installation torque, or lifting suitability.
For a quote, send the rope diameter and construction, intended application, clip type, finish, quantity, and any drawing or documentation requirements. Ask for installation instructions for the exact proposed model. If you are sourcing the complete assembly, review the steel wire rope range as well.
FAQs
Which Way Do Wire Rope Clips Go?
On a conventional U-bolt clip, the saddle goes on the live end and the U-bolt over the dead end. Trace the rope path first, then check the diagram for the actual clip. Other clip designs may differ.
How Many Wire Rope Clips Do I Need?
Use the required count in the instructions for your clip model, rope size and construction, and application, together with any applicable regulation. A figure from a different brand does not establish the count for a QDPowerful clip.
How Far Apart Should Wire Rope Clips Be?
Use the spacing and measurement points stated for the exact clip and rope. Check it together with the required clip count and turnback. Do not rely on a generic rope-diameter multiple for an unidentified clip.
What Torque Should I Use?
Use the value and tightening sequence specified for the exact clip model and compatible rope. Apply it with an appropriate torque wrench. The QDPowerful catalogue does not provide a model-specific torque table for this article.
Where Does the First Clip Go?
Use the first-clip position and placement sequence in the instructions for the identified model. No single location has been verified across the QDPowerful catalogue families listed here.
Do I Need a Thimble?
Fit a thimble if the termination design or applicable instructions call for one. It must suit the rope and the connecting hardware and remain properly seated in the eye.
Can Wire Rope Clips Be Reused?
Check the manufacturer’s instructions and site rules before reusing a clip. Inspect the threads, U-bolt, saddle, and contact surfaces for distortion, cracks, corrosion, or wear. Replace any suspect hardware.
Can I Use a Clip-Formed Eye for a Lifting Sling?
Not automatically. U.S. OSHA construction rules prohibit clip-formed eyes in wire rope bridles, slings, and bull wires. For any other setting, check the applicable rules, termination design, manufacturer’s limits, and qualified approval before use.
Are Wire Rope Clips and Clamps the Same Thing?
Both terms often refer to a U-bolt fitting, but “clamp” can describe other designs too. Use the drawing and model number to find the right installation instructions.
For a product inquiry, send QDPowerful the rope diameter and construction, intended use, preferred clip type, and documentation requirements. Use the installation instructions for the exact supplied model before putting the eye into service.